Now that we have the storage base in place and the cabinets framed up, it was time to start framing the walls and the roof. The wall frame is what gave us the silhouette of the trailer. We decided to go with a flat front and a tightly curved front top. We will most likely place checker plate on the front to protect it. The backend shape we decided to go with is the traditional sloped and slightly rounded back.
We wanted to insulate the trailer so we built the frame with 1.5″ x 1.5″ boards and used a Kreg Tool to join the frame. The areas that are rounded on the front and back are framed with 2 – 3/4″ boards glued and screwed together. This gave us a strong surface in which to mount our plywood skin and mount our doors.
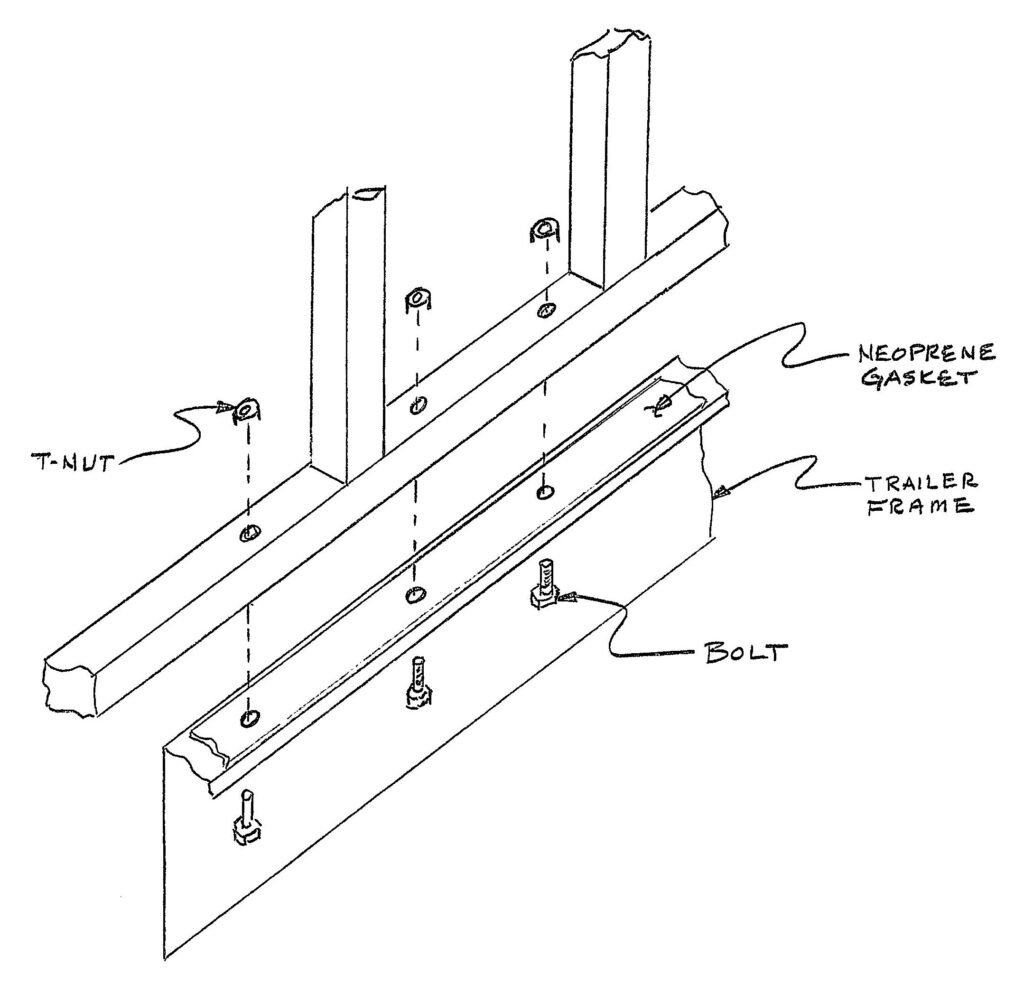
Once the frames were built they were mounted to the trailer frame. The trailer has a lip that goes around three sides. We placed a wide neoprene gasket on top of the lip. We then set the frame on top of the lip and drilled holes to bolt the frame down. A bolt with a t-nut was used to tighten the frame to the trailer lip. For more stiffening, we screwed the frame to the cabinetry in the a few strategic places. The image below shows how the frame was connected to the trailer.
Before we bolted the frame down, we mounted the inside skin. The inside skin consisted of an 1/8″ sheet of birch. Once the inside skin was mounted the frame was finally attached.
Once the two sides were mounted, it was time to install the front and ceiling frame. This was also made with 1.5″ x 1.5″ boards that screwed to the top of the frame. Once the cross members were in place, we filled the gaps with 1.5″ x 1.5″ boards so that we could be assured we had a good mounting surface for the outside skin. We did ensure that we had a good framed opening in the ceiling for the vent fan.
Once the top and front framing was in place, we cut all the insulation to fill the frame gaps. Note that we did not attach the insulation permanently because we still had to install wiring.
The last thing we installed at this point was the inside skin on the ceiling. This was a challenge mainly on the inside radius on the front. The inside skins were stapled into place. We also did install one plastic seam filler and then routed out the openings for the doors and the vent fan.
Finally, we did some preliminary painting to get some coats of protection in place. I am sure I will need to touch up some areas at the end.
Next, we will start on wiring up the trailer. This part will be a learning experience. Neither myself or my dad are knowledgeable in electricity or wiring. Time for some research.
See this full video on YouTube and the following URL. https://youtu.be/ufML7Q6dxcY