So we have been working on this teardrop camper for a while now. The trailer base has been cleaned up, new trailer wiring for the brake lights and side lights has been installed, the wheels have been cleaned up, and both the trailer base and the wheel hubs have been painted with the Durabak textured paint.
At this point it was time to make an assembly decision. The decision was do we start on the outside and build inward or do we start inward and work our way out. Most of the examples we had seen would build the walls and work their way inward. We decided to go the other direction and work our way outward. I could see advantages and disadvantages going either direction but we felt it would be best if we worked our way outward.
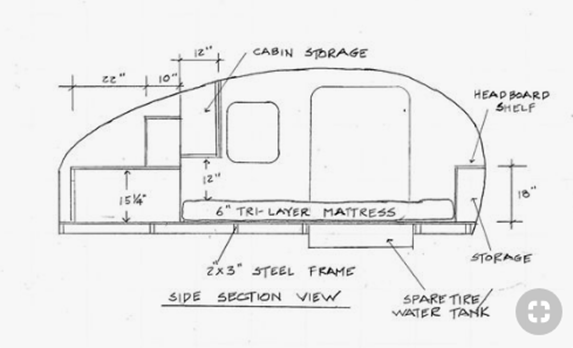
So, with that, we decided to start laying in a floor base that would have multiple access points to storage underneath the mattress. We wanted to put handles, labels, and have the underneath sectioned off so that items would not roll around much.
Once the flooring was in place, I bolted in some jackable stabilizers so as to help with trailer support and steadiness. Especially for the backend where I would be cooking.
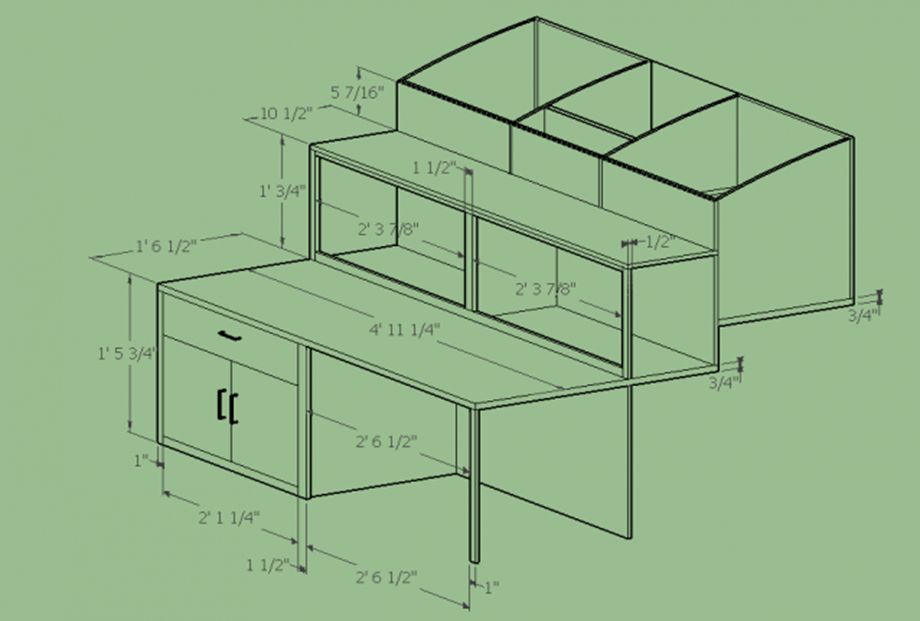
Below is the original cabinet design. It changed some, but not much. Our original design shows a window beside the door on each side. By the time we finished building the cabinets, we realized the windows where not going to fit. So, the windows where removed. Other than that, everything else was built to the drawings.
We started the cabinetry build with the headboard cabinet. This cabinet needed to be sturdy enough for me to lean against while sitting up in the bed and reading. This cabinet will also have some of the wiring running through it when we get to that point. We also have plans to create a decorative scene on these doors. The doors will lift upward and when shut will be held in place by magnets. Lastly, I added a spot for a 120v plugin and a place for two reading lights.
The next cabinet is the footboard cabinet. This cabinet will be an open cabinet with lighting underneath and will be used mainly for clothing storage. Under this cabinet will be an access door so that the mattress can be removed if need be. We bolted this cabinet rather heavily knowing it was cantilevering over my feet and we did not what it to shake loose.
Lastly is the galley cabinetry. This cabinetry will house all the cooking and food storage supplies (cooler, water jugs, propane, stove, and storage for utensils and supplies). The lower section of this cabinet will have doors on the front and is the section that has the access door for the mattress.
Now we are at the cabinetry finished product. We lacquered all of the wood with a dose of amber shellack. This gave a nice hard surface and a very polished sheen. We silhouetted a mountain scene on the headboard cabinetry. We also added a net in the back for an interesting look and added our name to the bottom access door.
In the back, on the bottom section, double jointed galley doors where added, a roll out tray was added for the cooler, and removable dividers where added to the hold the water jugs in place. A rack was built to hold the small propane bottles in place along with storage bins and baskets.
I also added 12v socket outlets and 120v outlet. This will allow for phone plugins, fan plugins, and utensil item plugin. The bin in the bottom has been bolted down and will hold kitchen ware and supplies.
So far the design is going well and we have not ran into to many issues. The headboard doors were a bit of a challenge getting the hinges on straight so that the doors would close cleanly. We added felt stick-on’s to help mute the closing of these doors. The doors in the galley area were also a challenge since they are double jointed. Other than those two items, everything is going well.